Publishing an app on the App Store comes down to four things: an Apple Developer account at $99 a year, a signed build uploaded to App Store Connect, a complete listing, and a review that returns a decision within 48 hours in 98% of cases. None of these is hard on its own. What costs time is discovering them in the wrong order.
The real risk is no longer technical: build signing, historically the scary part of iOS, is now automated by cloud build services. The risk is the avoidable rejection: a forgotten demo account, a rushed privacy questionnaire, a payment that bypasses in-app purchase. This guide follows the real order of operations and stops on each point that sinks a first submission. If you built the app with a no-code iOS app builder such as Cadrant, the build and the submission are guided, and the review rules stay the same.
It covers iOS only. Android is a different path with its own dedicated guide: publish an app on Google Play. To compare both stores before you start, our App Store and Google Play checklist puts the two journeys side by side.
What to prepare before you start
Everything below can be prepared while the app is still in development. On submission day you need:
- An active Apple Developer account. $99 a year, as an individual or as an organization. The organization account requires a DUNS number and publishes under the company name.
- An app tested on a real device. The simulator shows neither real performance nor system permissions.
- A 1024 × 1024 PNG icon, no transparency and no rounded corners: Apple applies those itself.
- A privacy policy online. Its URL is mandatory in the listing, even for an app that collects almost nothing.
- A demo account if your app requires sign-in: a valid login and password, provided in the review information.
How much does it cost to publish on the App Store?
Publishing an app on the App Store costs $99 a year and nothing else on Apple's side: no submission fee, no commission on a free app. The rest depends on your tooling choices. Here are the real line items, excluding the development of the app itself.
| Item | Price | Note |
|---|---|---|
| Apple Developer account | $99 a year | Mandatory, individual or organization. The account expires if you do not renew it, and the app is removed from the store with it. |
| Mac and Xcode | $0 | No longer required: a cloud build service such as EAS compiles and signs the binary for you. Expo's free plan covers 15 iOS builds a month. |
| Privacy policy | $0 | A page on your website is enough; free generators produce an acceptable text in ten minutes. |
| Apple commission | 0 to 30% | Only on digital content sold through in-app purchase: 15% under the Small Business Program, 30% above one million dollars of yearly revenue. |
| Google Play, for comparison | $25 once | No yearly subscription on Android, but the 12-tester rule for a personal account. |
For a free app published with a cloud build tool, the first year therefore comes to $99, and every following year to the same amount. The budget of the app itself is a separate question, covered in our guide on the cost of a mobile app.
The six steps, from build to launch
Here is the full journey, in the order it actually happens. The timelines assume a complete submission on the first try.
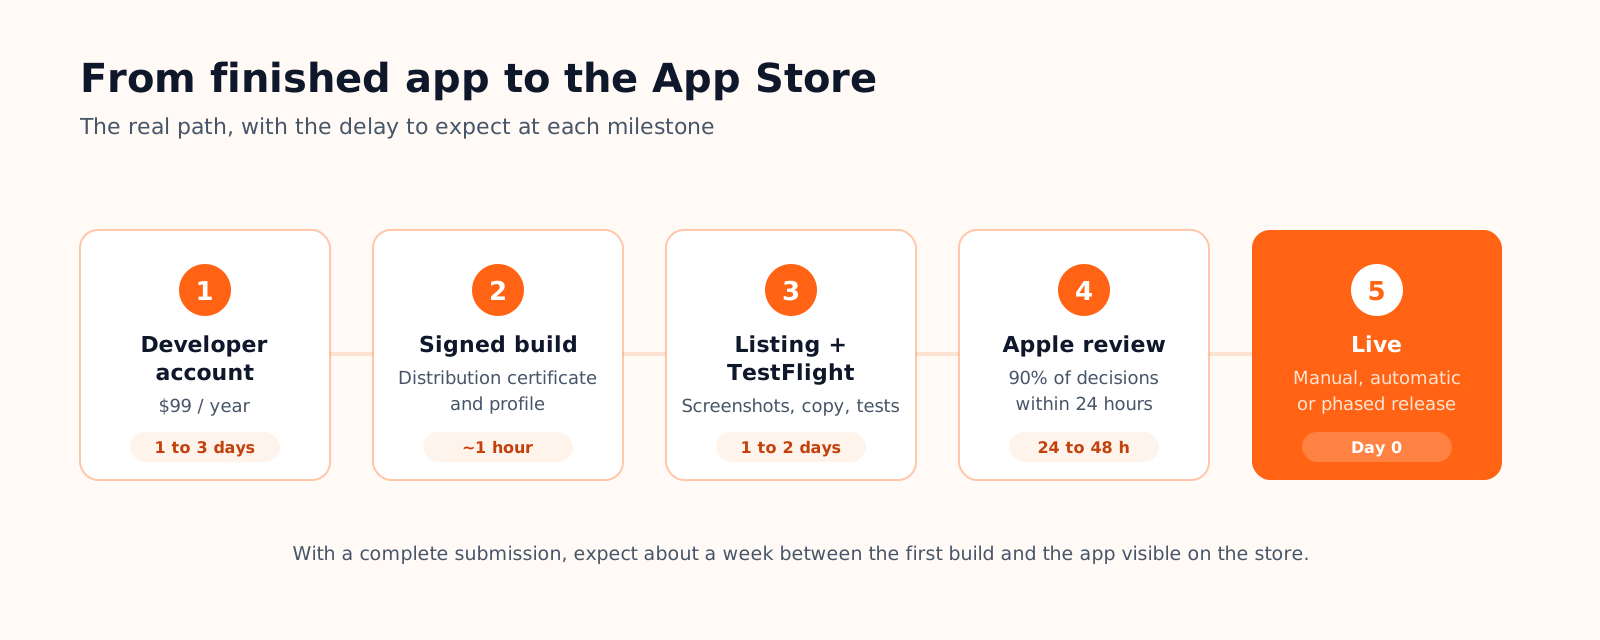
- Enroll in the Apple Developer Program. Enrollment happens on developer.apple.com with your Apple ID and an identity check. This account is what opens App Store Connect, the console where your apps live.
- Produce a signed build. An iOS binary must be signed by a distribution certificate and a provisioning profile tied to your account. A cloud build service like EAS creates both automatically and compiles on remote macOS machines; with Xcode you do it locally on a Mac.
- Create the listing on App Store Connect. Display name, bundle identifier (permanent, choose it carefully) and category. The listing can stay in draft while you test.
- Test with TestFlight. This is the exact binary your users will receive, not a preview. Internal testers get it immediately; external testers after a short beta review. The full mechanics are in our guide on how TestFlight works.
- Complete the listing. Description, keywords, iPhone screenshots (and iPad if supported), the App Privacy questionnaire, age rating, and the review information with the demo account.
- Submit, then release. Once the version is approved, you choose: immediate release, automatic on approval, or phased over seven days to watch the first feedback.
Apple review: real timelines and rejection reasons
Apple states that 90% of submissions get a decision within 24 hours, and 98% within 48 hours. In practice, plan one to three business days for a first submission. Regulated categories (finance, health, kids) go to specialized reviewers and may require supporting documents, so several extra days. The queue also slows in September, around the iOS release, and before the holiday freeze in December.
Rejection reasons are heavily concentrated. The App Review Guidelines list dozens, but five families cover most first submissions:
| Rejection reason | Guideline | How to avoid it |
|---|---|---|
| Crash or bug at launch | 2.1 | Test the TestFlight binary on several devices, not just the preview. |
| Missing or invalid demo account | 2.1 | Provide a login that works, with realistic data already in place. |
| Privacy: unjustified permissions | 5.1 | Request only the permissions you use, each with a clear explanation string. |
| Digital payment outside in-app purchase | 3.1.1 | Sell digital content through Apple's in-app purchase; physical goods may use external payment. |
| App judged too minimal or duplicated | 4.2 / 4.3 | Bring real app value: a repackaged website with no feature of its own gets rejected. |
A rejection is not a penalty: the Resolution Center states the exact reason, you fix it, you resubmit. The second review is often faster than the first. When it happens, our guide on App Store rejections and how to respond walks through the statuses, the eight usual reasons and the reply and appeal options.
Your submission kit: checklist, ready-to-copy texts and calendar
The steps above tell you what to do. This section gives you what to tick and what to paste. Keep it open next to App Store Connect: every line matches a field Apple checks before a version reaches a reviewer.
The pre-submission checklist
Sizes and limits come from Apple's screenshot specifications, the App Store Connect help and the guidelines quoted above, checked in October 2026.
| Item | What Apple expects | Where |
|---|---|---|
| ☐ Name and subtitle | 30 characters each | App Information |
| ☐ Promotional text, description, keywords | 170 characters, 4,000 characters, 100 bytes | Version page |
| ☐ iPhone screenshots | 1 to 10 at 1206 × 2622 or 1179 × 2556 px, the size Apple lists as required; PNG or JPEG without transparency | Version page |
| ☐ iPad screenshots | If the app runs on iPad: 2064 × 2752 or 2048 × 2732 px | Version page |
| ☐ Privacy policy | URL required for every app, and a link inside the app too | App Privacy |
| ☐ App Privacy labels | Data collected, including by third-party SDKs | App Privacy |
| ☐ Age rating | Updated questionnaire (4+, 9+, 13+, 16+, 18+), answers required to submit | App Information |
| ☐ Export compliance | Encryption questions; set ITSAppUsesNonExemptEncryption (usesNonExemptEncryption with Expo) so they stop coming back on every build | Build |
| ☐ Demo account | A working login with data, back end switched on (guideline 2.1) | App Review Information |
| ☐ Account deletion | Inside the app if users can create an account (5.1.1(v)) | Your app |
| ☐ Third-party login | Google or Facebook login for the main account requires an equivalent private option, such as Sign in with Apple (4.8) | Your app |
| ☐ Support URL | A page where users can reach you | Version page |
| ☐ EU trader status | Declare trader or non-trader to be distributed in the EU | Business |
| ☐ Recent SDK | Built with Xcode 26 and the iOS 26 SDK since 28 April 2026 | Your build tool |
Ready-to-copy texts
Replace the brackets, keep the structure. Promotional text can be changed at any time without a new version, which makes it the place for news; the description only changes with a new version.
Reply in the Resolution Center, one point per rejection reason, without arguing about other apps. For the appeal route and the eight usual reasons, see our guide on App Store rejections.
Day-by-day timeline
A realistic calendar for an individual account and a clean first submission.
| Day | Step | What can slow it down |
|---|---|---|
| Day 0 | Enroll, pay $99, identity check | Organization: get the DUNS number first, several business days |
| Days 1 to 3 | Account approved; create the app record and launch the first build (under an hour in the cloud) | Signing errors, a bundle ID already taken |
| Day 3 | Build processed; internal TestFlight testers install it | Processing can take up to an hour |
| Days 3 to 4 | External TestFlight after a short beta review | Missing test information |
| Days 4 to 5 | Listing, screenshots, App Privacy, age rating, review notes; submit | Screenshots at the wrong size |
| Days 5 to 7 | App Review: 90% of decisions within 24 hours | Regulated category, September rush |
| Day 7 | Release: manual, automatic or phased over 7 days | Each rejection adds 1 to 3 days |
Publishing to the App Store from Cadrant
If your app was built with Cadrant's mobile app builder, the build and submission part is guided end to end. Two accounts are involved and both stay yours: the build runs on your Expo account (the free plan covers 15 iOS builds a month), and the binary lands in your App Store Connect account.
- Secure Apple sign-in: authentication uses the SRP protocol, your Apple password is never stored.
- Listing created for you: name, 1024 × 1024 icon and bundle identifier are set up on App Store Connect automatically.
- Certificate provisioned automatically: the distribution certificate and profile are created with no manual steps, or imported as a .p12 if you already have one.
- Build then submission: the iOS build launches on your Expo account, and Expo delivers the binary to your App Store Connect. You take over for TestFlight, the listing and the submission.
The short version
- Open the Apple Developer account today: it is the only incompressible delay in the journey.
- Test the TestFlight binary, not the preview: that binary is what goes through review.
- Nail the three points that concentrate rejections: stability, demo account, privacy.