TestFlight is Apple's tool for distributing an app before it is on the App Store. You upload the signed binary to App Store Connect, invite people, and they install it on their own iPhone through the TestFlight app. What they receive is not a preview or a simulator: it is the exact build you will later submit to App Review, with its icon, its permissions and its native code.
Three numbers frame the whole service. Up to 100 internal testers who are members of your App Store Connect team, up to 10,000 external testers invited by email or through a public link, and 90 days of validity for each build. Everything else, from the beta review to the feedback screenshots, follows from how those two groups are treated differently. This guide walks the path from upload to a tester's phone, then lists the limits and the mistakes that delay a launch.
TestFlight is one step of a longer journey. If you need the whole sequence, from the developer account to the release, read our guide on how to publish an app on the App Store.
What TestFlight is and where it sits
TestFlight lives inside App Store Connect, under the tab of the same name, and on testers' devices as a free app from the App Store. It requires an Apple Developer Program membership on your side, and nothing but an Apple Account on the tester's side. It covers iOS, iPadOS, macOS, tvOS, watchOS and visionOS, so a Mac or Vision Pro build follows the same flow as an iPhone build.
Its place in the pipeline is between the build and the review. Earlier tools show your code on a phone faster but not as your real app: Expo Go loads only your JavaScript inside a shared shell, and a development build carries your native code but with developer tooling inside. TestFlight is the first moment you hold the production binary. Our guide to testing with Expo Go covers that earlier stage and its limits.
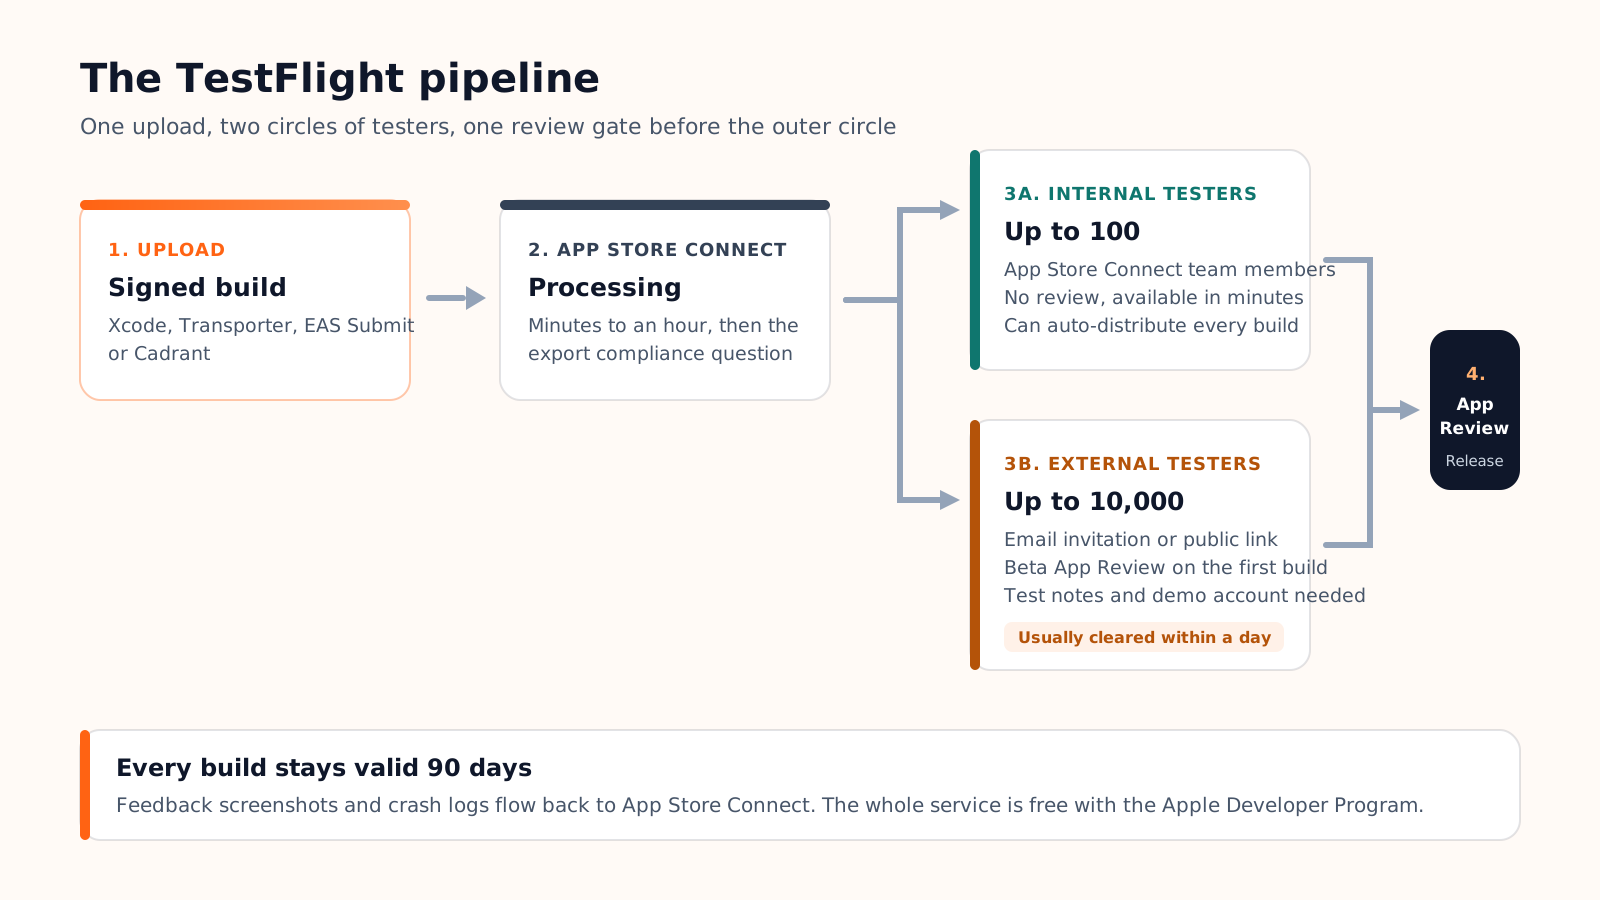
From upload to a tester's phone, step by step
1. Upload and processing
A build reaches App Store Connect from Xcode, from Apple's Transporter app, from a build service such as EAS Submit, or from a platform like Cadrant that drives EAS for you. Once uploaded, the build goes through processing: Apple checks the package, indexes the symbols and scans it, which takes from a few minutes to about an hour at busy times. It then appears under the TestFlight tab of your app with a status.
The first stop is often "Missing Compliance". Apple asks whether the app uses encryption beyond what iOS provides; for most apps that only make HTTPS calls, the answer is no, and you can set the ITSAppUsesNonExemptEncryption key in the app configuration so the question never blocks a build again. Until the answer is recorded, nobody can install the build.
2. Internal testers: your team, no review
Internal testers are people who hold a role in your App Store Connect team: Admin, App Manager, Developer, Marketing or Customer Support. You can have up to 100 of them per app, and they get every build minutes after processing, with no review by Apple. You can even tick "automatically distribute" on an internal group so each new upload goes out on its own. This is the loop for your own team: upload, test, fix, upload again, several times a day if needed.
3. External testers: up to 10,000 people and a beta review
External testers are anyone else: customers, friends, a waiting list. You organise them in groups, invite them by email or share a public link, and each group can receive different builds. The limit is 10,000 external testers per app across all groups. Apple's TestFlight overview sets the rules for both circles.
The difference from internal testing is Beta App Review. The first build you add to an external group is sent to App Review to check that it follows the App Review Guidelines, in practice a lighter check than the release review, which usually clears within a day. Later builds of the same version often go out without a new full review, unless you change things Apple cares about. For that review to pass, fill in the test information: what to test, a contact email, and a demo account if the app needs a sign-in.
4. On the tester's side
A tester installs the TestFlight app, opens the invitation email or the public link, accepts, and taps Install. The app appears on the home screen with an orange dot next to its name, the sign that it is a beta. When you push a new build, TestFlight notifies them and can update automatically. To send feedback, they take a screenshot and use the share sheet, or shake the device if you enabled it; the screenshot and their comment land in App Store Connect, along with crash logs for any crash the app suffers during testing.
Limits, timelines and the mistakes that cost a week
| Rule | Value | Consequence |
|---|---|---|
| Internal testers | 100 per app, App Store Connect users | Add teammates to the team first; they need a role, not just an email |
| External testers | 10,000 per app, email or public link | A public link can be capped and closed; criteria on the link reduce who gets in |
| Beta App Review | First build per external group, usually under a day | Plan the first external build a day before you need testers on it |
| Build validity | 90 days | After that, the app stops opening for testers until a new build is uploaded |
| Processing | Minutes to about an hour | Do not re-upload because a build is "not there yet"; wait for the email |
| Cost | Free with the Developer Program | The $99 a year membership is the only fee |
The delays people complain about rarely come from Apple. They come from these mistakes:
- Leaving the compliance question unanswered. The build sits at Missing Compliance and the invitations never fire. Set the encryption key in the configuration once.
- Expecting external testing to be instant. Internal is instant; external waits for Beta App Review. Use an internal group for the first hours and the external group for the first days.
- No test notes, no demo account. Beta App Review needs a way in, exactly like the release review. A login that works saves a rejected build.
- Inviting the wrong Apple Account. The invitation is tied to the email; if the tester's device uses another Apple Account, the invite never matches. Public links avoid the problem.
- Treating TestFlight as a distribution channel. The guidelines forbid using it to deliver an app to the public instead of the App Store, and builds die after 90 days anyway.
TestFlight with Cadrant
If your app is a Cadrant mobile project, the steps before TestFlight are handled for you: the iOS build runs on your own Expo account (the free plan covers 15 iOS builds a month), and Expo submits the finished binary to your App Store Connect account, where the app record and the distribution certificate were created during a guided flow. From there, you are in the standard TestFlight path: open App Store Connect, answer the compliance question if asked, add internal testers or an external group, and install on your devices.
What to check there is what the in-editor preview and Expo Go cannot show: native APIs such as camera, push notifications and file pickers, sign-in and data flows against your Supabase project, performance on a real device, and denied permissions or offline behaviour. Found a bug? Fix it in Cadrant, publish a new build, distribute it, repeat until you are ready for App Review. The Test with TestFlight documentation lists the exact clicks.
The short version
- Upload, wait for processing, answer the compliance question: only then can anyone install.
- Internal testers (100 team members) get builds instantly; external testers (10,000) wait for a Beta App Review on the first build of a version.
- Fill in test notes and a demo account, invite by public link when you can, and remember the 90-day expiry.
- Test on TestFlight what Expo Go cannot show, because the reviewer will.
Used this way, TestFlight is not an extra step before launch: it is the launch, rehearsed with real people on real phones, a few days early.