Expo Go is a free app, available on the App Store and Google Play, that runs your Expo project on a real phone without compiling anything. You start the project on your computer, scan a QR code, and the screen you were editing appears on your iPhone or Android device a few seconds later. Save a file, the phone updates. For a first version of an app, it is the shortest path from code to a real touchscreen.
It is also the tool that newcomers misunderstand most. Expo Go is not your app, and it is never the binary you ship: it is a container that already includes the native side of the Expo SDK and loads only your JavaScript. That single fact explains what it can test, what it cannot, the version errors you will meet, and why Expo added an account sign-in rule in 2026. This guide covers all of it, with the workflow for both platforms.
If Expo itself is new to you, start with our overview of what Expo is; this article assumes you have a project and want to see it on a phone.
What Expo Go actually does
An Expo app has two halves. The native half is compiled code: the React Native runtime, the Expo SDK modules for the camera, location, notifications or files, and any native library you add. The JavaScript half is your screens and logic, bundled by the Metro development server. Building the native half takes minutes on a Mac or a cloud build service; bundling the JavaScript half takes seconds.
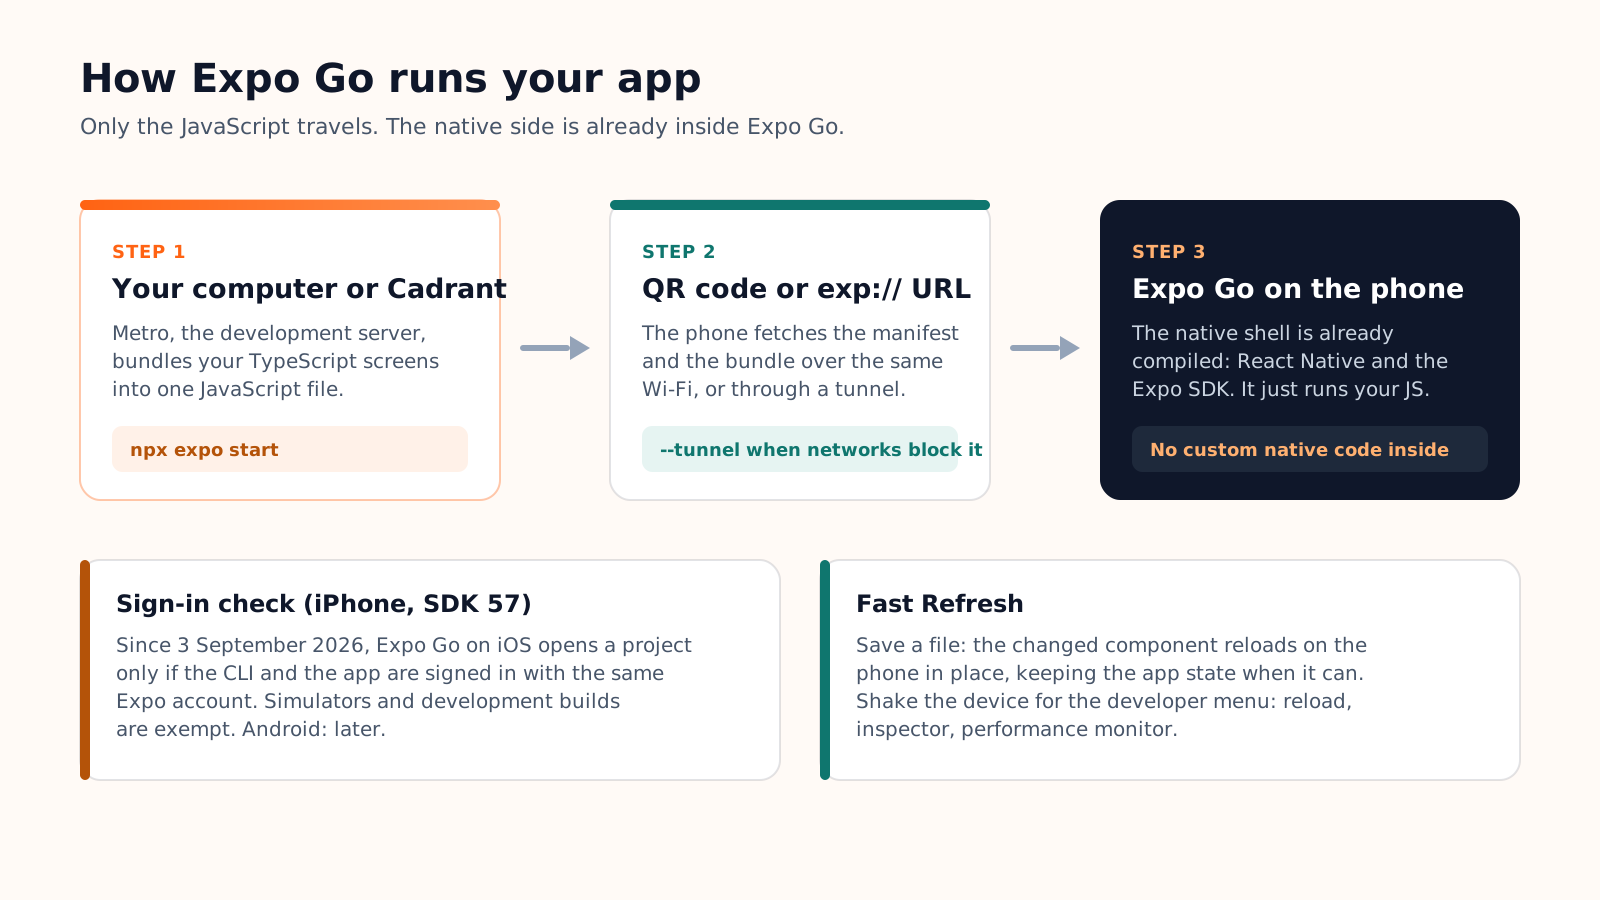
Expo Go ships the native half pre-built, once, for everyone: a fixed set of Expo SDK modules compiled into a single app that Expo publishes on the stores. When you scan the QR code, Expo Go asks Metro for a manifest, downloads your JavaScript bundle over the local network, and runs it inside its own native shell. Nothing is compiled on your side. This is why it is so fast, and why it only works when your project uses the same SDK version as the Expo Go build installed on the phone.
Testing on iPhone and Android, step by step
The workflow is the same on both platforms, with one difference in 2026: on iPhone, Expo Go now checks that you are signed in with the same Expo account as the command line that started the project.
1. Install Expo Go and sign in
On iPhone, install Expo Go from the App Store. The version for SDK 57 came back to the store in September 2026 after several months in Apple's review queue, during which it had to be installed as a personal TestFlight build. On Android, install it from Google Play, or from expo.dev/go if you need an older SDK version, which the store no longer offers.
Then create a free Expo account on expo.dev if you do not have one, and sign in twice: in Expo Go on the phone, and in the Expo CLI on your computer with the expo login command. Since 3 September 2026, Expo requires the same account on both sides to open an SDK 57 project in Expo Go on a physical iPhone. Simulators are exempt, development builds are exempt, and Android will get the same rule later. If the accounts differ, the project simply refuses to open.
2. Start the project and scan the QR code
In the project folder, run npx expo start. Metro starts, prints a QR code in the terminal and an address of the form exp://192.168.x.x:8081. On iPhone, open the built-in Camera app, point it at the QR code and tap the banner: it opens Expo Go directly. On Android, open Expo Go and use its "Scan QR code" button. If the phone and the computer see each other, the bundle downloads and your first screen appears.
From there, every save triggers Fast Refresh: the changed component reloads in place, keeping the app state when it can. Shake the phone to open the developer menu, which lets you reload manually, open the element inspector or enable the performance monitor.
3. Same network, tunnel, and the usual errors
The phone loads the bundle from your computer, so both must be on the same Wi-Fi network and the network must allow devices to talk to each other. Office and hotel networks often block that. The fix is a tunnel: npx expo start --tunnel routes the connection through an ngrok URL that works from any network, at the cost of a slower first load. Most remaining problems fall into a handful of messages:
| What you see | What it means | What to do |
|---|---|---|
| Project is incompatible with this version of Expo Go | Your project's SDK and the installed Expo Go do not match | Upgrade the project with npx expo install expo@latest, or install the Expo Go build for your SDK from expo.dev/go |
| The project will not open, or asks you to sign in | iPhone only: the CLI and Expo Go are not signed in with the same account | Run npx expo whoami, sign in with expo login, and check the account name in Expo Go's profile tab |
| Something went wrong: could not connect to the server | The phone cannot reach your computer over the network | Same Wi-Fi for both, allow port 8081 in the firewall, or restart with --tunnel |
| Native module cannot be null, or a red screen at launch | The project uses native code that is not part of the Expo SDK | Expo Go cannot run it: switch to a development build for that project |
| The app opens but a feature silently does nothing | A capability that Expo Go does not support, such as remote push notifications | Test that feature in a development build or in TestFlight |
What Expo Go cannot test, and what to use instead
Because the native half is fixed, Expo Go stops exactly where your project needs native code that is not in the Expo SDK: a third-party native library, a config plugin that changes the iOS or Android project, a custom Swift or Kotlin module. It also cannot show you the things that only exist in your own binary: your app icon and splash screen, your bundle identifier, your deep links, your in-app purchases. Since SDK 53, Expo has also removed remote push notifications from Expo Go and points to development builds for them.
The replacement is a development build: your own app, compiled once with the developer tools inside, that you install on the phone and then reload live exactly like Expo Go. It contains your native modules, your icon and your identifiers, and it does not need an Expo account to open a project. The final check before submission is a different tool again: TestFlight on iOS and the internal testing track on Google Play install the real release binary.
| You want to check | Expo Go | Development build | TestFlight / Play internal testing |
|---|---|---|---|
| Screens, navigation, layout on a real screen | Yes | Yes | Yes |
| Camera, location, sensors, image picker (expo-* modules) | Yes | Yes | Yes |
| Third-party native library or custom native module | No | Yes | Yes |
| Remote push notifications | No | Yes | Yes |
| App icon, splash screen, deep links, in-app purchases | No | Yes | Yes |
| The exact binary users will install | No | No | Yes |
| Setup cost | None | One build (EAS or local), then live reload | A release build and a store account |
Expo Go inside Cadrant
Native mobile projects on Cadrant are Expo and React Native apps, so the same rules apply. The editor previews the app in a phone frame, and a QR code opens the live project in Expo Go on your own device. Because of the 2026 sign-in rule, the QR code appears once your Expo account is connected: create a free account on expo.dev, generate a personal access token, paste it under Settings, Integrations, Expo, then sign in to Expo Go on the phone with that same account. Cadrant starts the development server with your token, so the account check passes.
Most expo-* APIs run there directly, which covers day-to-day testing: camera, location, sensors, image picker, local notifications. For native code outside the SDK, and for a final check, publish a real build: the iOS binary is compiled on your Expo account and delivered to your App Store Connect, where TestFlight installs it on your devices; on Android, the build lands in the internal testing track of your Play Console. The native mobile apps documentation details both paths.
The short version
- Expo Go is a pre-built container for the Expo SDK: it loads your JavaScript, never your native code, and it must match your project's SDK version.
- On iPhone since September 2026, sign in with the same Expo account in the CLI and in Expo Go, or the project will not open; simulators and development builds are exempt.
- Same Wi-Fi or a tunnel, then scan: the Camera app on iPhone, the in-app scanner on Android.
- Custom native modules, remote push notifications, icons, deep links and purchases need a development build; the exact binary needs TestFlight or the Play internal track.
Use Expo Go for what it is best at, seeing a screen on a real phone thirty seconds after writing it, and move to a development build the day your project needs something the container does not have. The switch is a one-time build, not a rewrite.